Cover Mockups and Element Choice

HOW THE PROCESS BEGAN
I started by placing my main cover photos into a blank flyer page on Canva. I then increased the size of the photo to fill the page, to make it seem like a professional magazine cover. I started with the main image in order to layer the masthead and cover lines on top of it and not have the image interfere with trying to create content on the magazine cover.
MAIN IMAGE
For the main image, the placement is completely centered in the middle, as it is a picture of a bowl of plant-based food. The main image relates to one of the articles that is a coverline on the magazine cover. There is no background on this photo that I added to it. The subject in the main image is a round bowl, and the photo was taken on a white countertop. There is a blank color behind the subject, with only the shadows from the bowl showing on the countertop. I did not edit this photo at all because while I was shooting this photo, I adjusted the lighting in order to create a brighter photo.
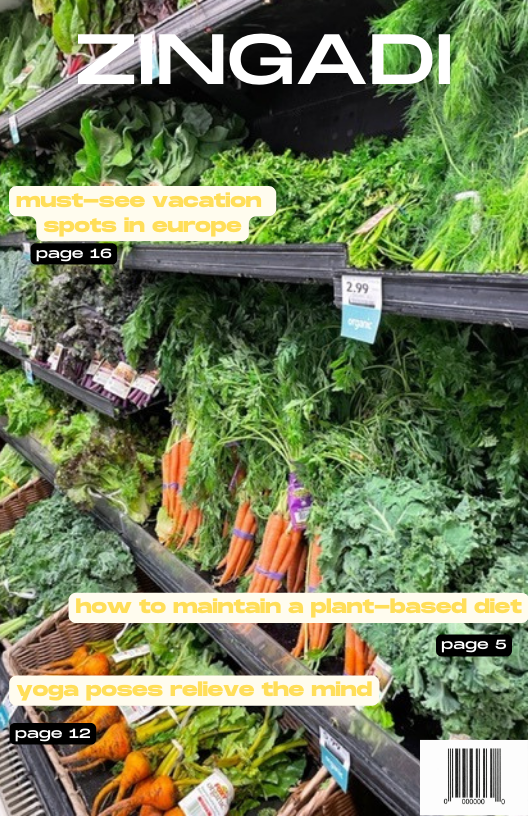
For the second magazine cover, the main image is an aisle of fresh and green produce from a side angle. The main image also relates to another coverline on the cover, but when I am designing my final product, I will create an article that more closely resembles the main image. There is no background for the image because the entire photograph is filled and there is not much negative space that would be suitable to add a background. I did not edit this photo, as my camera was able to adjust the colors and lighting while the photo was being taken.
COLOR SCHEME CHOICES
For the first magazine cover, I used a dark brown font color for the masthead, as the main image has many neutral colors, like tan, beige, light yellow, and brown. As for the coverlines and other words on the cover, I used black in order to create contrast with the white background from the image and to make it easy to see and read when the viewer sees the magazine. For the second magazine cover, the main image contains light greens, dark greens, orange, and small amounts of black. For the masthead, I used white in order to really allow for it to stand out against the main image, but not clash with it. For the cover lines and page numbers, I was originally going to use just yellow, but unfortunately, the yellow was not visible in the background. In order to make it readable, I added a white background just behind the text, like a highlighter would do, in order to tie back to the use of white for the masthead and allow for the viewer to clearly read the content.
MASTHEAD
The masthead for both magazine covers is on top of the page, as that is what is most commonly used in other lifestyle magazines, as mentioned in past blog posts. The font is called “Monument”, and is clean and simple, which leads to it also looking elegant.
THEME
Because I simply used the same cover lines and ideas for both magazine covers just for the mockup, there is no theme content-wise yet, but as I create more content and write articles that directly relate to the main image on the cover, a theme can be seen. Visually, there is a theme in the first cover with the browns and creating a simplicity that allows for the cover to not be overpowering. There is not necessarily a theme for the second cover besides the greens, yellow, and white going together.
FONTS
The masthead uses the font “Monument” in all capital letters on both magazine covers, and this font will always be used on issue in order to create a familiarity to the viewer so that they can instantly spot this magazine and purchase it. The cover lines and page numbers used the font “Monument UltraLight”, so it is very similar, just not as bolded. By using the same typeface but a different font, the magazine covers are cohesive, but not too boring. When using the same font, it is common that the viewer is not able to tell what points on the cover are more important, like the masthead compared to the coverlines.
LAYOUT CHOICES
For the first magazine cover, I tried to use the blank/ negative space from the white countertop as the background, and fill it up by placing the coverlines and barcode in those areas. There was a lot of space at the bottom of the page, so I placed two cover lines and page numbers there, and a barcode in the bottom right corner, as that is where they are most commonly seen, especially in lifestyle magazines. The masthead took up the negative space above the subject of the bowl, so I did not want to overcrowd that area specifically, as the viewer should see the mast head first and not get distracted by other elements.
For the second magazine cover, there was barely any negative space that was available to use, which almost made it seem less professional than the first cover, as there is a background to most of the text. The masthead is in the same spot as the first cover, just a different font color. The barcode is also in the bottom right corner, but there is a wite background to the barcode, as well. The cover lines are distributed generally at the bottom of the cover, with one of them being at the top. There is no content in the middle of the page because I wanted to show the main image more and the idea behind it by connecting it to the article that is at the top of the page.
To sum up, I believe the first magazine cover is more professional than the second one, as the background behind the font in the second cover takes away from the aesthetic of the main image. Most of the cover aligns with the genre of lifestyle magazines, except for the background behind the text, and not having one main headline, which is generally a story about famous incidents of people in order to make it a selling point for the magazine. I will definitely change the placement of the coverlines, especially in the second cover, so that the cover is more elegant and cohesive.

Comments
Post a Comment